
Every designer and artist knows that sometimes you just need a little creative push. So lets start the new year with some creative inspiration. Here are some Creative sites that I have used in the past to get things going.
You can also check out our work from Blind Eye Creative here.
Have a safe and happy new year.
Wednesday, December 31, 2008
Monday, December 29, 2008
Santa Claus Bailout Hearing
Hope everyone had a great holiday...
To keep the good times rolling through the end of the year I thought todays post would be something a bit more humorous.
Here is "Santa Claus Bailout Hearing". A spoof of the Automotive Industry Bailout Hearing.
Santa Claus Bailout Hearing
Enjoy!
To keep the good times rolling through the end of the year I thought todays post would be something a bit more humorous.
Here is "Santa Claus Bailout Hearing". A spoof of the Automotive Industry Bailout Hearing.
Santa Claus Bailout Hearing
Enjoy!
Tuesday, December 23, 2008
Photoshop Christmas Frame: Creating A Christmas Photo Frame Using Photoshop
Okay everyone. I was asked a few weeks back about how to make holiday photo frames and borders. So, this tutorial is done in response to that. Here you go.
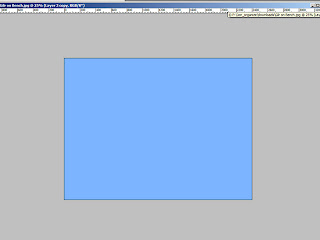
Step 1.) Open your photo in photoshop.
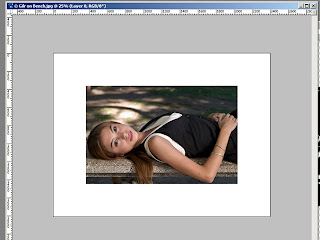
Open a second layer above the photo and fill it in with a light blue (I used #8eb3ff). This will be your basis for the frame. Now you need your snowflake brush.
Step 2.) Get a snowflake brush or an image of a snowflake to use as your brush. I have provided the one I used for anyone who wants to use it. Simply click the snowflake below and save the image to your computer. Open the image in photoshop then go to Edit>Define Brush Preset. This will create a snowflake brush that you can use to paint your snowflakes in.

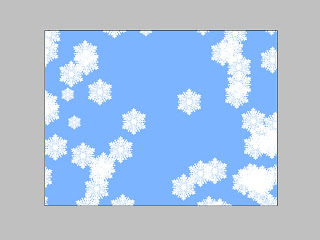
Step 3.) Back in the file with your photo and the blue top layer, open a new layer above the blue layer and get your brush tool. Set your brush to your new snowflake brush and open your brush palette. Here are the settings I used:
Then, using white, paint a few strokes in the layer above the blue. The flakes will drop in scattered all over the page.
Step 4.) Now go select the blue layer and click the "add vector mask" button at the bottom of the layers palette (it looks like a small white circle in the middle of a gray square). Now, in the layers palette, select the layer mask, not the image layer, and get your snowflake brush out. Turn off all the scattering and shape Dynamics and enlarge the brush as big as you want your photo window to be and select your color to black. Next, in the layer mask, paint on flake where you need your window to be (this will make it so you can see the photo under the blue layer). Then, take a regular black brush and fill in, in the layer mask window, any of the spaces left by the snowflake.
Lastly, select the layer mask, press and hold the alt key (option Mac) and drag the layer mask into the layer above with all the painted flakes. This will duplicate the layer mask in the flake layer.

Step 5.) Add a drop shadow layer style to both the flake layer and the blue layer.
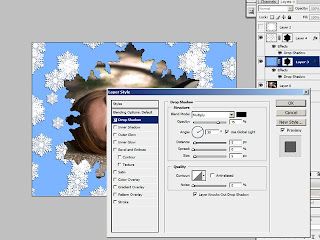
Now adjust your photo layer so the image fits in the screen the way you want it to and your done. Now you have a nice christmas photo frame that you can use over and over again.
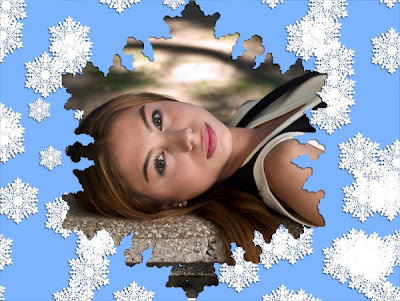
Merry Christmas!
Step 1.) Open your photo in photoshop.

Open a second layer above the photo and fill it in with a light blue (I used #8eb3ff). This will be your basis for the frame. Now you need your snowflake brush.

Step 2.) Get a snowflake brush or an image of a snowflake to use as your brush. I have provided the one I used for anyone who wants to use it. Simply click the snowflake below and save the image to your computer. Open the image in photoshop then go to Edit>Define Brush Preset. This will create a snowflake brush that you can use to paint your snowflakes in.

Step 3.) Back in the file with your photo and the blue top layer, open a new layer above the blue layer and get your brush tool. Set your brush to your new snowflake brush and open your brush palette. Here are the settings I used:
- Shape Dynamics:
- Angle jitter 17%
- Roundness jitter 9%
- Minimun roundness 25%
- Scattering:
- Scatter: (check) both axes, 852%
- Count jitter 98%
- smoothing
- protect texture
Then, using white, paint a few strokes in the layer above the blue. The flakes will drop in scattered all over the page.

Step 4.) Now go select the blue layer and click the "add vector mask" button at the bottom of the layers palette (it looks like a small white circle in the middle of a gray square). Now, in the layers palette, select the layer mask, not the image layer, and get your snowflake brush out. Turn off all the scattering and shape Dynamics and enlarge the brush as big as you want your photo window to be and select your color to black. Next, in the layer mask, paint on flake where you need your window to be (this will make it so you can see the photo under the blue layer). Then, take a regular black brush and fill in, in the layer mask window, any of the spaces left by the snowflake.
Lastly, select the layer mask, press and hold the alt key (option Mac) and drag the layer mask into the layer above with all the painted flakes. This will duplicate the layer mask in the flake layer.

Step 5.) Add a drop shadow layer style to both the flake layer and the blue layer.

Now adjust your photo layer so the image fits in the screen the way you want it to and your done. Now you have a nice christmas photo frame that you can use over and over again.

Merry Christmas!
Sunday, December 21, 2008
Updates & Downloads
- Apple has released their new Mac OS X 10.5.6 Update: The Mac OS X 10.5.6 Update is recommended for Mac OS X 10.5 Leopard versions 10.5, 10.5.1, 10.5.2, 10.5.3, 10.5.4, and 10.5.5. It includes general operating system fixes that enhance the stability, compatibility and security of your Mac. Get the download here
- Looking for FREE photoshop brushes? Brusheezy is a great site for hundreds of free brush downloads to enhance your photoshop experience. Get the brushes here
Saturday, December 20, 2008
The "Favicon": How To Make A Favicon Using Photoshop
You may be asking what is a favicon? Well, the favicon is the small image that appears in the address bar next to your URL. It also appears in your bookmarked site, on your tabbed browsing, and on your internet shortcuts on your desktop.
Free Tutorial Here.
Free Tutorial Here.
Friday, December 19, 2008
Photoshop Tutorial: Stairway To Heaven

Step 1.) Create a rectangle with a gray background and a black gradient. Duplicate the layer and free transform the new layer. Since it had to be uniform I went to the top bar of the page and reduced the width to 95%. Repeat this step until you have the height you want. I later added some extra gradients to the steps to get more depth

Step 2.) Apply an outer glow to each step. Also, add a gaussian blur of about 4.2 to each step (filter>blur>gaussian blur).

Step 3.) Bring in an image of clouds and warp and transform to fit what you need.

Step 4.) Set your layer with the clouds to overlay. (I actually duplicated that layer 3 more times and set their blend modes to overlay, overlay, soft light, and soft light. It may seem redundant but if I take one out the image of the clouds doesn't seem to look as good).

Step 5.) I used the same image of clouds for the stairs as I did for the cloud puff at the bottom of the stairs. I just transformed it to fit across the bottom of the page and put a layer mask (black) over the image. I then used a soft edge brush set to white on the layer mask section of the layer and painted what I wanted back in as the cloud. I then added a drop shadow, inner shadow, outer glow, inner glow, gradient overlay, and a color overlay (using a blue from the stairs). I then reduced the fill of the layer to 98%.

Step 6.) Finally, I created a new layer above all the other layers and with your colors set to white and gray, go to filter>render>clouds. Then set your layer to multiply and reduce the layer fill to about 24%. I also did some Dodging and burning (highlights, midtones, and shadows) to this layer to get some extra depth.

The handrail was done with shape layers with an added bevel/emboss layer style added. I then used the blur tool on the ends that meet the stairs to give it a clean look.
The Final Result

The Final Result

Font Conference
If you are into fonts this is very funny.
Font Conference
April Andrews (Forum User @ NAPP) posted this on the NAPP forums.
Font Conference
April Andrews (Forum User @ NAPP) posted this on the NAPP forums.
Trimming Fat? But it's almost Christmas!
O.k. so I am not talking about diet plans as the title might suggest, but it is equally important. As we are officially in a recession everyone is finding ways to "trim the fat." Be it cutting budgets, finding ways to be more efficient or reusing paper cups we all want to make our money go a little further. But where should we cut? Well I am not a finance expert but I can say that we should all be careful to not cut something that seems like a luxury expense but in reality is not. What am I talking about? Well... the big M word: MARKETING. It might not seem like the greatest idea to spend a couple thousand on direct mail campaigns or the like but a time like this is the best time for it. Why!?
In recessions or economic downturns a lot of companies will do just that. They will suspend current campaigns or cancel future ones, but they are really doing themselves a disservice by missing this opportunity. Marketing is more important now more than ever to stay relevant and visible to your customer. Many companies will shrink into the background in order to save money in the short term and then realize that while they were waiting for safer times to spend money they lost their customer base. Marketing is a must. It is always an essential to successful business and the businesses that will weather the storm are the ones that won't forget about it.
This doesn't necessarily mean that you should market in the same way. It might mean changing your approach and trying more creative and cost effective ways of reaching your customers (i.e. "beefier" website, email campaigns), but whatever you do don't forget to remain vigilant in your marketing. Stay relevant to your customers and use this time as a way to get ahead of your competitors. If they're all "trimming" their own Marketing "fat" you could afford to take that extra piece of the "pie." :) O.k. a bad joke but you can appreciate the analogy.
Subscribe to:
Comments (Atom)
